
Having the correct nocking point height is crucial to having an arrow that flies in a way that its pointing in the direction that it’s moving. If the nocking point is considerably high or low, the arrow will look a bit like this when it comes out of the bow if viewed from the side:
If the nock point is at the low end (near 0 mm), then the back of the arrow will be fairly close to the shelf of the bow and the fletches may hit it in passing. If this happens in the same way every time, then that can be perfectly consistent even if it does cause some wear to the fletch thats being repeatedly deformed. If it only occasionally hits (when the archer flubs their release) then the arrow would be expected to be deflected somewhat.
If the nock point is at the high end, it’s less clear what’s it’s likely to look like. During the time when the arrow is in contact with the arrow rest, which is only the first few milliseconds of movement, the arrow angle will be changing significantly as the nock end gets closer to the bow. This could press the arrow shaft into the arrow rest, making it more likely to break over time.
I decided to take a series of videos to see how changing the nocking point affected the amount the shaft moved up and down while it was still in contact with the string, and how much the fletches touched the bow. I was also interested to see what the flight looked like when at my “ideal” nocking point height, and whether the flight was similar for a wide range araound this point or if changed rapidly on either side of that region.
In my case, “ideal” means about 9 mm above the zero line, and was determined by shooting fletched and bare arrows until they both hit the target at the same height and angle at 8-30 m. This is a pretty standard procedure. The idea is that when the path that the tail of the arrow follows is above or below the path that the point follows, the tail experiences more drag. If the tail has fletches on it, then it will rotate so that the tail is following the point after a few meters. If the tail has no fletches, it will experience less drag and will rotate much more gradually. So if the two arrows land in the same place, that means that the arrows were flying with the tail following the point.
The “ideal” nocking point is quite dependent on the archer – if the pressure on the string from fingers below the string changes relative to the pressure from the finger (if any) above the string, this changes how the arrow moves up and down between when the arrow is released and when it leaves the string. Likewise, changing the height of the grip and the position of the pressure point on the grip affects the relative pull of the top and bottom limbs on the arrow and changes the arrow flight. So there is nothing special about my current preferred nocking point height other than it works for me.
The test can be done at longer distsances and indeed the result is more sensitive, but the slightly increased drag on the fletches compared to a bare shaft means the former will drop more, which will give a higher “correct” nocking point height than at shorter distances. At 70 m, the nocking point height that gives bare and fletched arrows in the same group is several mm higher than the one at 20-30 m.
Definitions
Firstly, the nocking point height can be defined in several ways depending on whether someone has one or two nocking points, and whether they mean the top or bottom of the top or bottom nocking point, or the middle of the arrow nock. The most common definition though is the bottom of the top (or only) nocking point as the nock of the arrow naturally rests against this point when nocked. That is the definition I’m using.
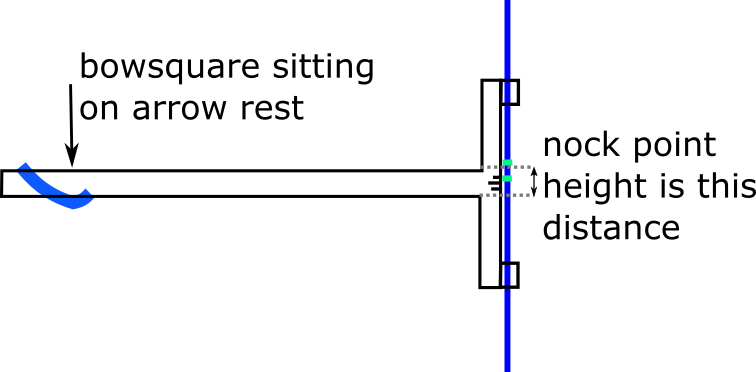
Many bowsquares have a “0” line which is halfway between the top and bottom of the bowsquare. This is so that it works equally well left and right handed; it’s not an actual 0 line.
When the nocking point height is set to 0, the arrow point is pointing slightly up because the arrow nock does not have zero thickness. To have the arrow at excatly 90o to the string, half the height of the arrow nock would need to be added.
Method
I used my regular bow setup. It gives the loose nock fit recommended by the Easton tuning guide: if I give the string a good flick a few inches away from the nocking point, the arrow drops off the bow. I changed the nocking point height by rotating a homemade nock and measuring the height with my bowsquare, which has an increment of 1mm. The uncertainty in each value was a bit less than half a mm.
The camera, a Sony RX100 mkIV was set to the highest frame rate of 1000 fps. To minimise arrow motion blur, the shutter was at the maximum setting of 1/12800. As the arrow has a speed of about 63 m/s after leaving the string, it travels 4.9 mm during each frame so there is still a noticeably amount of motion blur. As such high shutter speeds require a significant amount of light, a 500 W halogen light was pointed at the bow window from about 20 cm away. The vanes used were mylar Spin-Wing vanes which extend 7 mm away from the arrow and are 45 mm long.
The clicker was used for each arrow, though as the reaction time of 15 ms between the clicker falling and the arrow beginning to move would double the video length, each clip was cut to begin as the arrow started to move.
Result
As the camera was at the same height as the arrow, only vertical movements of the shaft are visible. The bending of the arrow in the horizontal plane is not seen. These arrows are matched to the bow and archer, and there is considerable clearance between the arrow rest and button and the back end of the arrow as it passes the bow.
The movement of the clicker after the arrow has left the bow was a surprise. However, the clicker is a fairly flexible piece of spring steel and a considerable amount of vibration (about 13 J) is dissipated in the bow after the arrow leaves.

At low heights
The lowest nocking point height that gave clearance for the spin-wing vanes was either 6 or 7 mm. Due to the motion blur it’s a bit ambiguous which it is. If I’d been using 4″ plastifletch vanes which are 13 mm tall instead, then the minimum for clearance would have been around 10 mm if a vane was pointing straight down. If the vane was 30o away from horizontal as is common when three fletches are used, the minimum would be halved.
I also did a few shots while either pushing the bow with the heel of my hand, which moved the tail of the arrow 2 mm lower as it was passing the button, and the webbing between my thumb and index finger, which moved the arrow 2 mm higher. These represent the extremes of pressure point. In practice, I would expect my natural inconsistency in bow hand pressure to contribute about 1 mm of variability to the arrow clearance.
With only one shot per setting, it’s impossible to be definitive, but the clearance between the shaft and the arrow shelf increases somewhat linearly from 4 mm at a nock height of 0 to 14.5 mm at a nock height of 16. The available data isn’t enough to tell whether there would still be a plateau from 9 – 14 mm if I redid those settings several times.
Is clearance necessary? It doesn’t seem to be the case with feathers, which are are often thick enough that they always hit the bow somewhat. Vanes that don’t clear the bow tend to leave a build-up of plastic on the bow, which itself isn’t much of an issue but does increase arrow maintenance. Spin-wings are quite fragile and crease easily so any contact is undesireable. However, a feather (or vane) that always brushes past the riser with a similar amount of contact is consistent. A somewhat stiff vane that sometimes clears the riser and sometimes doesn’t is a way to introduce error since some small arrow deflection caused by the vane contact is likely.
At higher heights
As the nocking point height is increased above 9 mm, the amount the shaft moves up and down in flight increases. This is best seen by comparing the height of the shaft as it passes the clicker
Best height
From the videos alone, I don’t have any data that would indicate a particular ideal value. While values too low for vane clearance would be undesireable, the increased wobble at higher values doesn’t have a clear downside that I’m aware of.
The height that gave the straightest flight in terms of total vertical motion of the shaft was at 9 mm +- 1 mm. This is also the height that gives the straightest flight according to the bareshaft test. It’s refreshing that there is at least a correlation between the two.
However, I can’t say that 9 mm gives me any better accuracy than any other value. It’s possible that it does, but I haven’t done any testing that would give me an idea of it. I’ve used a range of nocking point heights from 6 – 12 mm at different times, either for a non-performance based reason like having the same sight mark for bareshafts and fletched arrows at 70 m, or by accident.
While minimising the angle between the arrow shaft and the direction of flight does reduce drag, I don’t know if it’s by a significant enough amount to care. Besides, the arrow with the least drag is not necessarily the best grouping arrow. However, I don’t have any evidence and I haven’t seen any systematic tests of nocking point height and group size yet, though there are enough anecdotes that it’s worth testing, and the anecdotes indicate a large enough difference in group size that it should be possible to run the test without needing hundreds of arrows per nocking point height.

3 replies on “A quick look at nocking point height”
This is great info, thanks for sharing. I’m about to set up a new riser and content like this helps me to visualise the effects of various nock heights
LikeLike
Is this a typo: “A somewhat stiff vane that sometimes clears the riser and sometimes doesn’t is a way to introduce [error, randomness?] as some small arrow deflection caused by the vane contact is likely. “
LikeLike
Yup, thanks for catching that!
LikeLike